If you’ve been pedaling a bike for any length of time, chances are that you’ve had some sort of bike mechanical on the trail, the most common being the inevitable flat tire. Personally, I’ve broken a chain and countless spokes, ripped my rear derailleur off, torn sidewalls…in addition to the regular pinch and puncture flats. I haven’t always been the handy mechanic I am today (well, actually, who are we kidding here?), but I’ve learned a few quick fixes along the way, which will, at the very least, save you a hike out of the woods and get you home safely.
1. The Flat Tire
Flats happen. It’s a fact of life. Riding a clean line might save you a few tubes, but you can’t foresee everything. Pointy rocks and pinch flats are waiting to empty your tires of air. I’ve come across flat victims who have all the right equipment, but no idea how to fix a flat. Or worse, unprepared riders with no tubes or pump at all. Yes, I’ve been that person. Don’t be that person. Be prepared. Conveniently, Scott House, our marketing guru and White Pine Touring mountain biking guide, made this handy how-to video in case you need a refresher on how to fix a flat tire.
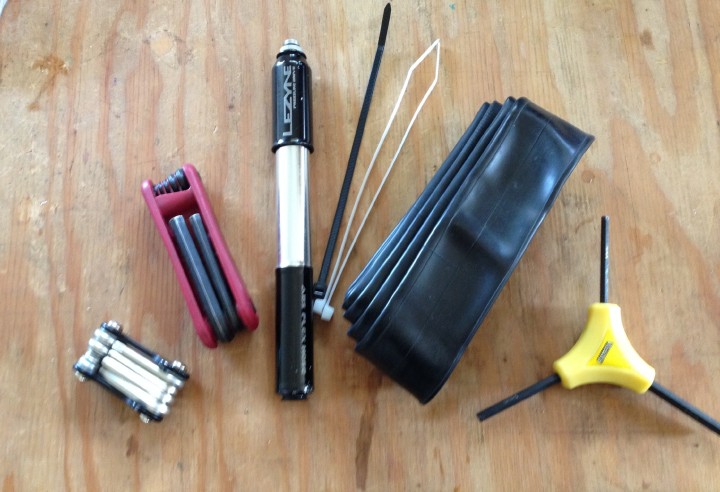
What you need:
- Spare tube
- Tire lever
- Pump or CO2 cartridge and inflator
2. The Broken Chain
Mis-shifting can sometimes put your chain in an awkward, unlucky position, and if you put force on your cranks at that very moment, chances are that you’ll snap a link in your chain. Snapping a chain from pure force is a myth, unless your chain was defectively installed to begin with. Anyhow, if you find yourself trailside with a chain falling out of your drivetrain, don’t fret. Here’s Scott House showing us how to get out of this potentially sticky situation.
What You Need:
- Chain tool (included on some multi-tools)
- Master link
3. The Torn Sidewall
This is very similar to the Flat Tire, but takes a little more jury-rigging to get home. If you’ve flatted and found a visible hole in your tire, chances are that you’ll flat again even when you toss a new tube in there. And, you probably aren’t riding with a spare tire, or even a tire patching kit. So, you have to get creative when nursing this wounded tire back home.
Before you put the new tube into your tire, line the tire with a makeshift patch.
Here’s the list of things I’ve used:
- Receipt (fold over a few times)
- Clif Bar wrapper
- $1 bill (Rumor is that Paul Boyle only uses Benjamins, though)
- Duct tape (fold it over a few times)
Then, put the tube in like you would for a normal flat fix and carry on. Just remember that this is ideally only a temporary repair- replace the tire or patch it more permanently when you get home.
4. The Broken Spoke
“Tink-tink-tink” – if you hear this sound coming from one of your wheels, it usually indicates that you’ve broken a spoke, and that it’s now flapping around hitting your other spokes. Other than the annoying musical instrument you’ve now created, it’s also a hazard – the spoke can get caught in other moving parts and cause a catastrophic incident. If your wheel is too much out of true to spin, your day is done – you should probably start hiking your bike. If your wheel is still relatively true, take the loose end of the broken spoke and wrap it around another spoke to hold it in place. Just remember to nurse your bike for the rest of the ride – don’t rail corners or mob over rock gardens as your wheel’s strength is fairly compromised at this point. Like the torn sidewall fix, this is a very temporary fix, and you should bring the wheel in to your local bike shop to replace the spoke before your next ride.
5. Random Loose Parts
You’re JRA (Just Riding Along) and you hear some more rattling than usual coming from your bike. In an ideal world, regular maintenance and bolt checking would prevent anything from coming loose while riding, but that isn’t always the case. The most common bike part loosening up is the headset. If you notice a lot of noise or movement coming from your front end, especially when engaging the front brake, you might want to stop and check your headset. Turn your handlebars as pictured below and put your hand over your headset. With a firm grip, move your hand back and forth – if you can feel movement in the bearings, it’s loose.

Use your multi-tool to tighten down the top cap and stem.
I’ve also had my front brake rattle off. Thankfully, I found all the bolts and managed to put it back on. With all the various bolts that hold a bike together, it’s always a good idea to ride with a multi-tool. My personal favorite is the Crank Brothers Multi-17 Tool, which pretty much has all the Allen wrench sizes you’ll need, a chain tool, and various other wrenches and screwdrivers for trailside mechanicals.
Being Prepared
Having the know-how to fix a variety of bike repairs on the trail doesn’t do you any good if you don’t have the right tools for the job, and vice versa. So, practice in your own garage to get these skills dialed in before the moment of truth. And, check out our inventory of bike tools which will get your bike back rolling down the trail.
- Crank Brothers Multi-17
- Crank Brothers Sterling Pump
- Crank Brothers Speedier Lever
- Continental Tube – 29’er
Evelyn Dong, content writer

